If you don’t mind a little challenge, in this tutorial, I’ll teach you everything you need to know on how to build a website for your coaching business with WordPress.
Although this tutorial was created to help coaches, you can follow the same steps to learn how to create a website for any business.
Key Takeaways
- You can either hire a website designer for coaches, or you can learn how to build a website for your coaching business by yourself, for free.
- Regardless of your coaching niche, having a website for your business is very important.
- With WordPress, building a website for your coaching business is super easy.
Step By Step Guide On How To Build A Coaching Business Website With WordPress
Table of Contents
- Do Life Coaches Need A Website?
- How Much Does A Coaching Business Website Design Cost?
- Step 1: Buy A Domain Name And A Hosting Server
- Step 2: Set Up WordPress On Your Hosting Server
- Step 3: Get Started With WordPress
- Step 4: Getting Inspirations For Your New Coaching Business Website Design
- Step 5: Create Home, About and Services, and Contact Page
- Step 6: Install A Template On Your New WordPress Website
- Step 7: Designing Your Website With Elementor
- Step 8: Embed Calendly Appointments With EMC
- Step 9: Add A Contact Form To Your Contact Page With Ninja Forms
- Step 10: Keep Your Website Complaint
- Step 11: Launch Your Coaching Business Website
- Step 12: Perform Ongoing Website Maintenance
- Conclusion
Estimated Reading Time: 20 minutes | Difficulty Level: Medium | Download PDF
Do Life Coaches Need A Website?
Regardless of your niche, it’s very important to have a website for your coaching business.
Unlike social media marketing, when you create a website for your coaching business, you get to have more control, and it helps you reach more potential clients.
How Much Does A Coaching Business Website Design Cost?
Usually, creating a website for a coaching business costs around $3,000-$10,000+, depending on your digital marketing goals. However, in this tutorial, you’ll learn how to build a coaching business website yourself, for free.
Now that you know that investing in a website is worth your time and money, let’s get to the step by step process of creating one for yourself.
Step 1: Buy A Domain Name And A Hosting Server
If you’re not familiar with what a domain name or a hosting server is, think of them this way:
Your domain name is something like your house address. If your friends needed to visit you, they would need to know the address of your house to get to you.
Your hosting server is the land where your house is built on.
While your website is your house.
Where To Buy A Domain Name & Hosting Server For Your Coaching Website
Here is a list of top websites to buy a domain name & hosting server for your new coaching site:
- Namecheap: plans from $24-$60/yearly
- Bluehost: plans from $36-$168/yearly
- Kualo: plans from $99-$249/yearly
- WPEngine: plans from $156-$696/yearly
Step 2: Set Up WordPress On Your Hosting Server
When creating a coaching website, WordPress is the best website builder to use. It’s completely free and easy to use.
With WordPress, you can choose from thousands of templates to design your website. It also come with thousands of plugins/tools for adding extra features(like appointment scheduling, etc).
Install WordPress Via Your cPanel
After purchasing your domain name & hosting server, find your way to your hosting account’s cPanel.
You don’t need to worry about what a cPanel is. Usually, it should be easy accessible from your hosting account dashboard.
However, if you can’t find it easily, you might need to contact the hosting’s customer support to ask. They will send you your cPanel url, and your login details.
Once you have the details, back them up safely, then login to your cPanel.
After you’re logged in, scroll down to somewhere called Softaculous App Installer and click on it.
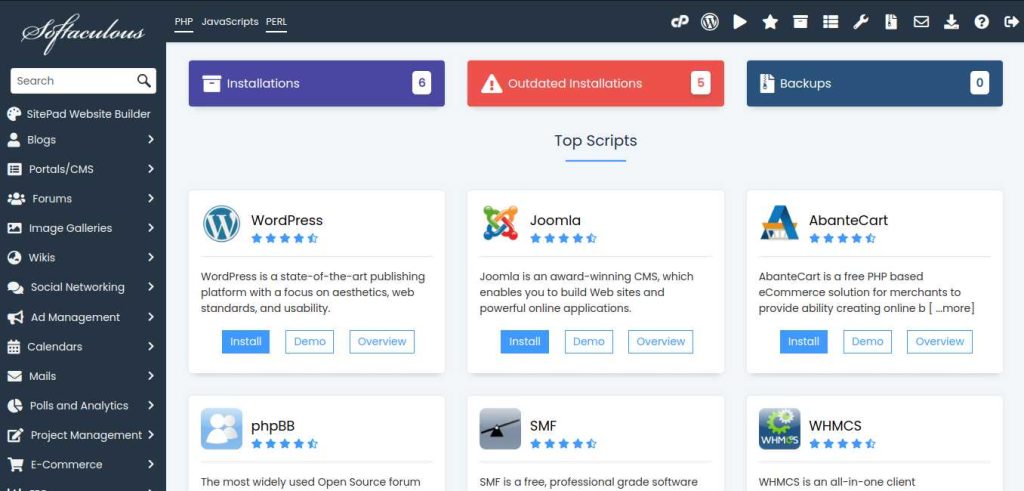
Choose the option to install WordPress.
Under the Choose Installation URL, select the domain name your purchased earlier from the dropdown, and ensure to choose the one with just https://
Below Site Settings, fill in your business name, tagline(or short description about what you do/who you help), leave the two checkboxes unchecked.
For Admin Account section, take note of the username and password generated for you, or simply add the ones you can easily remember later. It’s really important to add your correct email address in the email field, in case you need to reset your login details etc.
Under Select Plugins, mark the checkboxes beside Limit Login Attempts, and Classic Editor. Then click the Install button.
The installation process may take some minutes to complete, once it’s done, go to: https://yourwebsiteurl/wp-admin, and login with your username and password.
Congratulations, you just created a new wordpress website for your coaching business!
Step 3: Get Started With WordPress
Right now, when people visit your new coaching website, they’ll see a boring site with placeholder texts. We’ll change this soon.
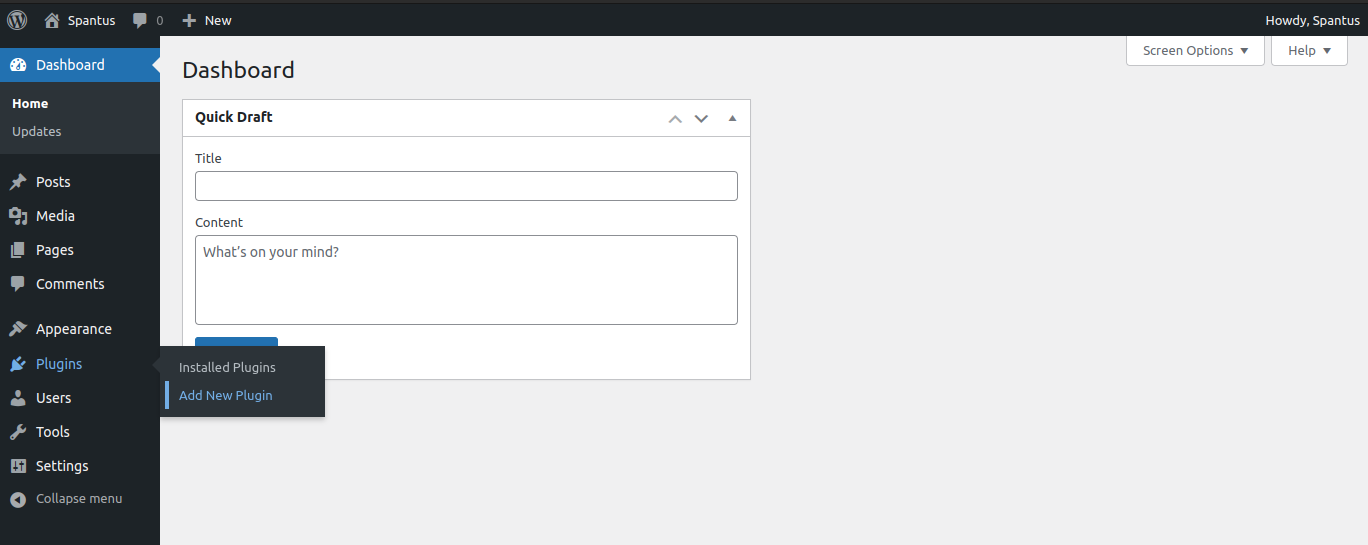
I won’t cover everything there is to know about WordPress in this tutorial, but for now, it’s enough to know you can access your dashboard at https://yourwebsiteurl/wp-admin.
From your WordPress dashboard, you have the power to change everything about your site.
Install Needed Plugins
Think of plugins as the extra tools like hammers, etc, that you need to build your coaching business website(house).
To keep things simple, I’ll tell you the plugins you need to install. Then later, I’ll tell you why you need them. Right now, go to your WordPress dashboard: https://yourwebsiteurl/wp-admin.
By your left, you’ll see a long list of places you can go to from your dashboard. Take note of this admin menu, I’ll refer to it a lot in this tutorial.
We need the plugins installer feature to add new plugins to WordPress.
From the admin menu, scroll down to Plugins, and click Add New.
In the search bar, type in Elementor, and click the Install button to add it. After installing Elementor, right click on the Activate button and open it in a new tab.
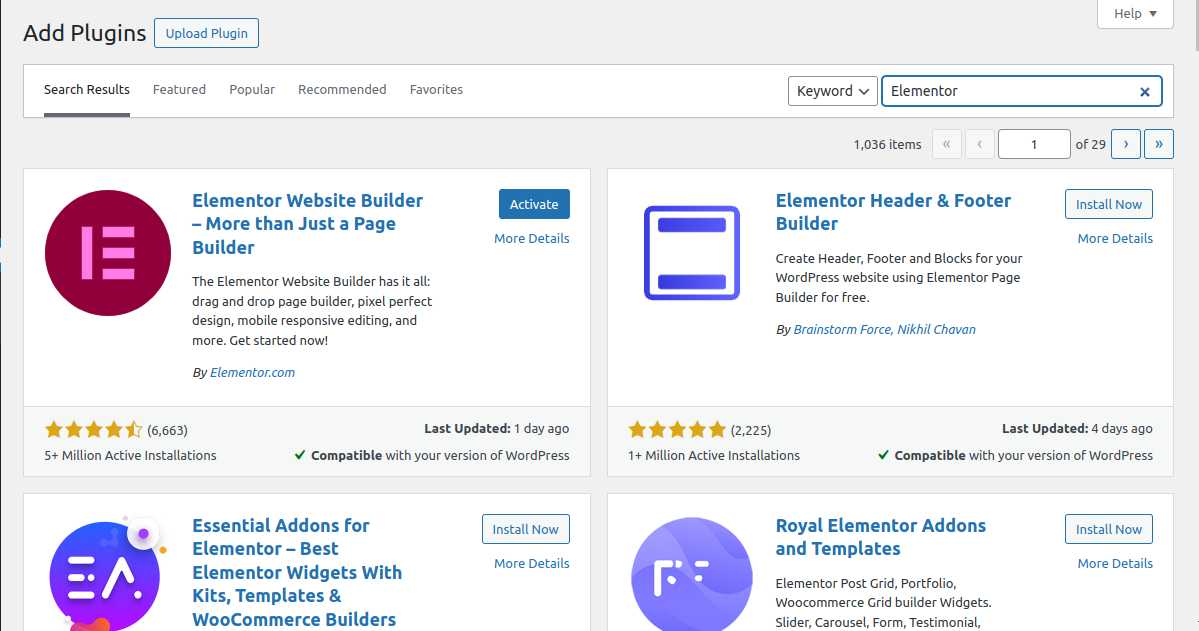
You can skip the Elementor account creation/onboarding steps if you wish.
In the same search bar, type Embed Calendly, install and activate it too. Then repeat the same process for Ninja Forms and CookieYes.
Once you’re done, from the admin menu, go to Plugins > Installed Plugins, and ensure all the following plugins are activated:
- Limit Login Attempts
- Classic Editor
- Elementor
- Embed Calendly
- Ninja Forms
- CookieYes
Step 4: Getting Inspirations For Your New Coaching Business Website Design
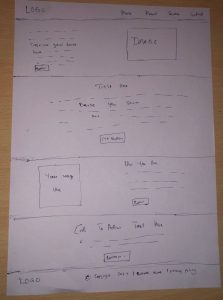
To get inspirations for your site design, list 4 websites you like a lot, and 4 people that also do what you do. Check out their websites, and note the things you like the most about them.
Also decide the main colors you will use throughout the site. Ideally, 2 colors are great. Check out this tool for choosing good color combinations that are accessible.
Then on a paper, sketch your home, about, and services page layout/design. The sketch doesn’t need to be perfect, we just need something to guide us when we start designing your own website.
Keep it in mind that, there is no rule about how often you can change your website design until it feels right to you. Which means, after learning how to build a website for your coaching business, whatever you design can be changed later as you get familiar with WordPress.
So, right now, we don’t need to worry about coming up with a world class design, something simple yet beautiful will do just fine.
Ideally, the layout of the pages can follow this pattern:
- Header : Where your logo & navigation menus are.
- Banner: Introduces what the page is about.
- Detail Sections: Other sections you wish to add to describe your business.
- Footer: Where the copyright information is.
See my sketch below.

Now that we have an idea of how your coaching site should look like, let’s start designing it on WordPress!
Step 5: Create Home, About and Services, and Contact Page
When creating a website for your coaching business, the most important pages to have on it includes: Home page, About page, Services page, and Contact page.
From the admin menu, go to Pages > Add New.
For the page title, type Home, and then click Publish.
Repeat the same process for About, Services, and Contact Page.
Step 6: Install A Template On Your New WordPress Website
Go to the admin menu again, then click Templates > Add new and type Hello Elementor in the search bar, then activate it.
I’ll show you how to build your coaching business website with Elementor in the next steps.
Step 7: Designing Your New Website With Elementor
Now that we’ve created our coaching business site, and the pages needed. It’s time to actually start designing it!
Customize Your Website Header
First, let’s create the navigation menu: Home, About, Services and Contact links.
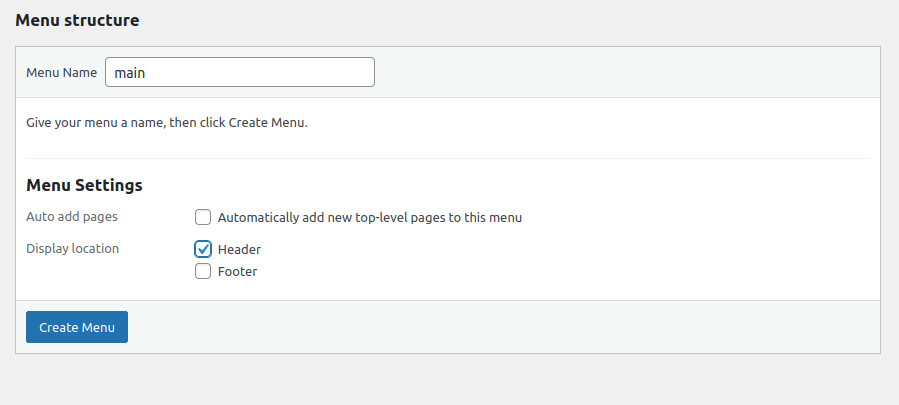
From the admin menu, go to Appearance > Menus. Under the Menu Name, write Header, mark the checkbox beside the Header menu position as shown below and click Create Menu.
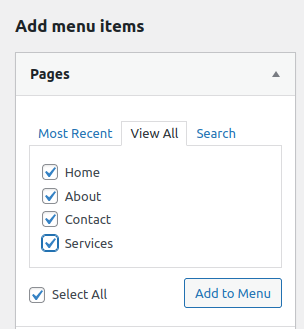
Now below Menu Items, mark the checkboxes beside all the pages we created earlier, and save the menu.
Once you’re done, we need to add your logo to the header and footer area. From the admin menu, go to Appearance > Customizer.
On the customizer page, click on Site Identity, and then click on Select logo to upload your logo. When uploading your logo, click the Skip cropping, and then hit the Publish button.
Now go back by clicking the back button icon, near the You are customizing Sitename.
Then click the Homepage Settings, and then under Your homepage displays, choose the A static page. Under Homepage, choose the Home page we created earlier, and hit the Publish button.
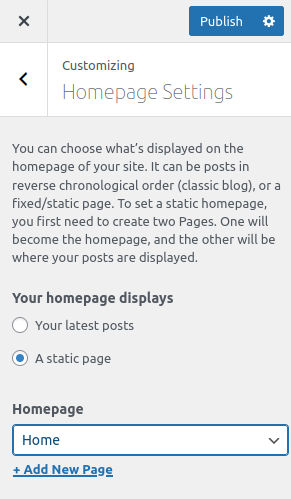
This will ensure your Home page is the first page visitors will see when they visit your site.
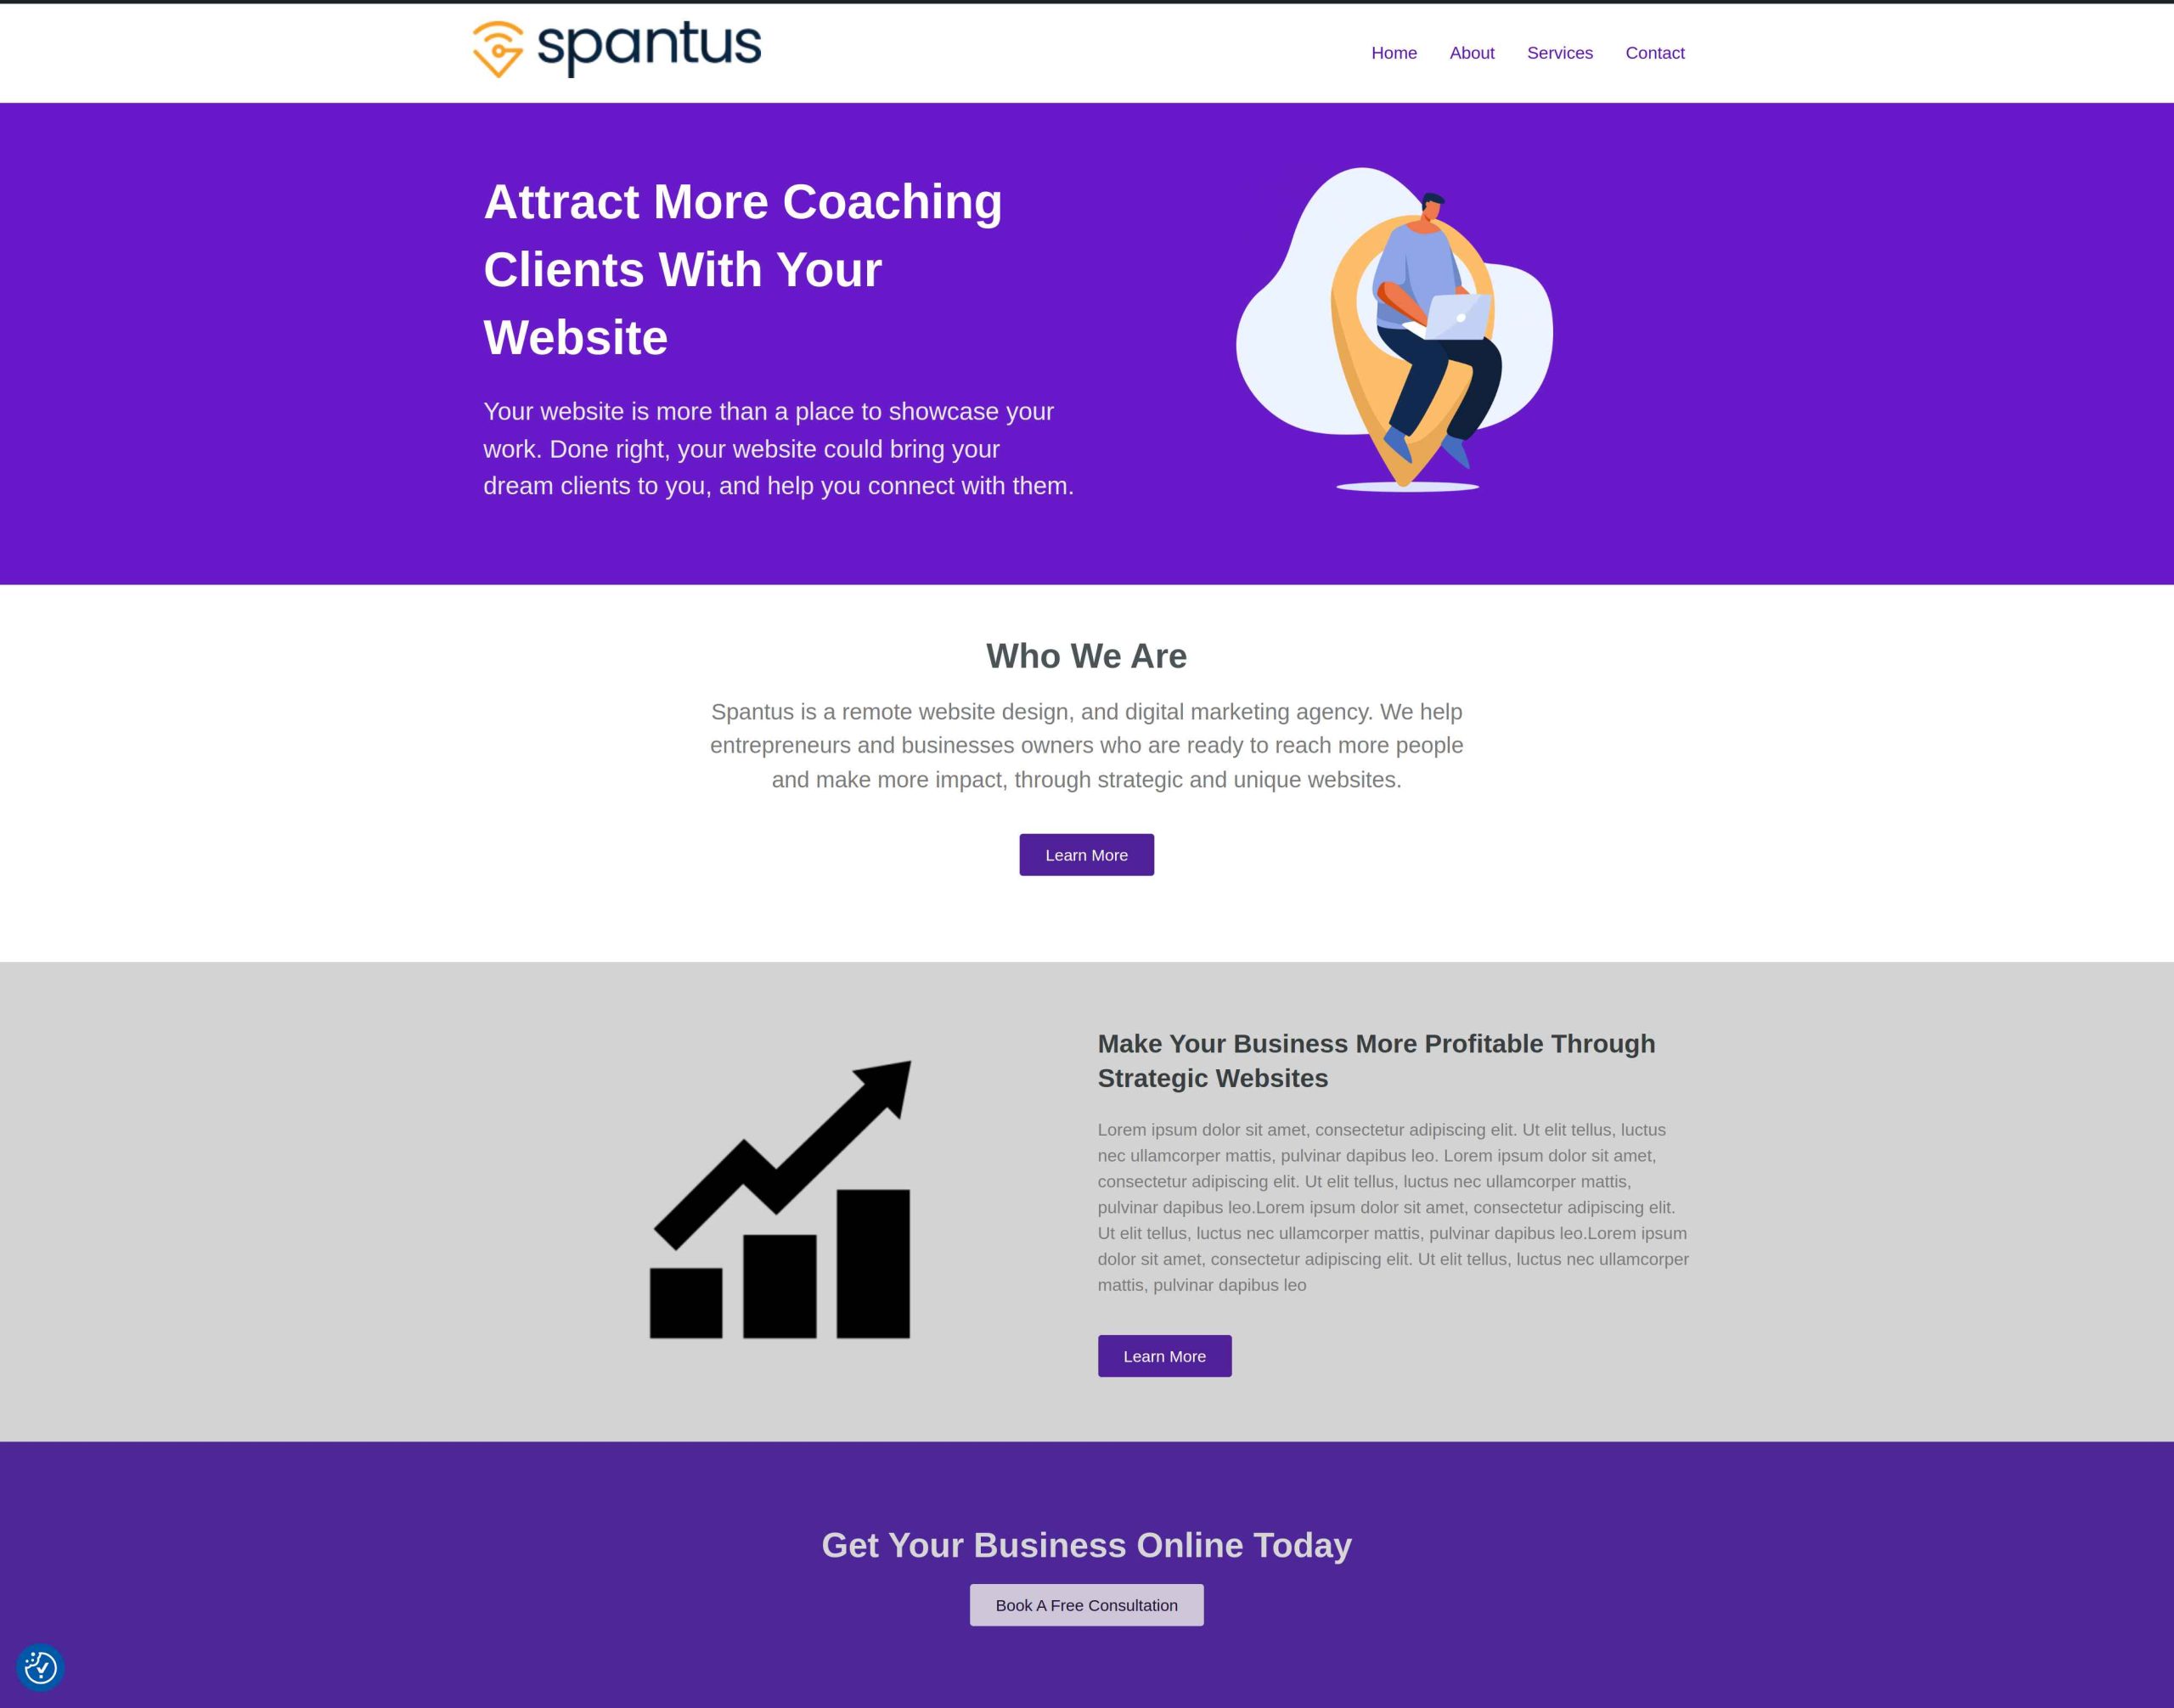
Design Your Home, About, and Services Page With Elementor Page Builder
Let’s start designing the Home page to match what we sketched in Step 4.
From the admin menu, click Pages and edit the Home page we created earlier. Click the Edit With Elementor button.
A live page editor should open, this is where we’ll design the actual layout for your homepage.
How to Design Your Coaching Business Website With Elementor
With the Elementor Page Builder, you can customize your WordPress pages to look exactly like your sketch. I’ll be designing my sketch in Step 4.
Firstly, let’s get rid of the page title. Click the settings icon as shown below.
![]()
Then scroll down to Hide Title and enable it.
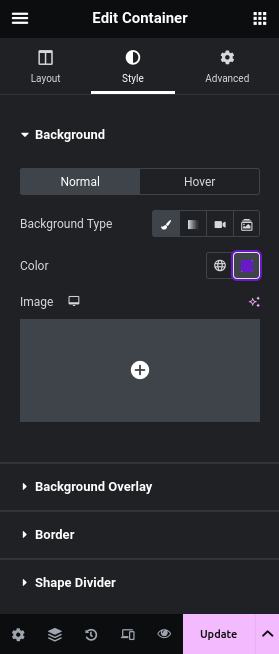
Now, we’ll use Elementor Containers to create the sections/rectangle areas as drawn in the sketch. In my sketch, the second section after the header is the banner area.
Click the plus icon and select the structure as shown below.

Edit the container settings, and under the Style tab, click the brush icon, then click Color to add color to the container.
You can click the other icons to add gradient, image or a video as your container background.
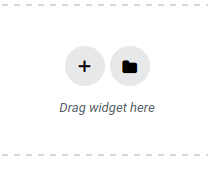
To add things inside the container, we need Elementor Widgets for this. You can find them by clicking the icon beside the Edit Containers.
Or you can also click the plus icon inside the two sub containers that was generated earlier.

Drag the Heading/Text Editor widgets to add texts inside any container. And when you do, you can adjust the text style settings(color, size, alignment etc.), from the Style tab, under the widget settings.
Follow the same method to add images and buttons to any of the containers.
To adjust the vertical and horizontal spacing of contents inside the container, under the main container settings, click the Advanced tab and adjust the Padding values to suit you.
You can click the little icon after the left padding value, to ensure you can add custom padding for different sides of the container.
Repeat the same steps for all the sections in your sketch.
You can watch me design my sketched layout in the video here, see the result below:
Step 8: Manage Appointments & Embed Calendly With EMC Scheduling Manager
One of the most important features you need on your coaching site is an appointment scheduling system.
We’ll use EMC to embed Calendly into WordPress, making it easier for potential clients to book a session directly from your website.
Download and install EMC Scheduling Manager from WordPress plugins page, then create an account with Calendly, and setup your availability accordingly.
Once you’re done, go to their Integrations page. Generate a new API key, copy the key then save it somewhere.
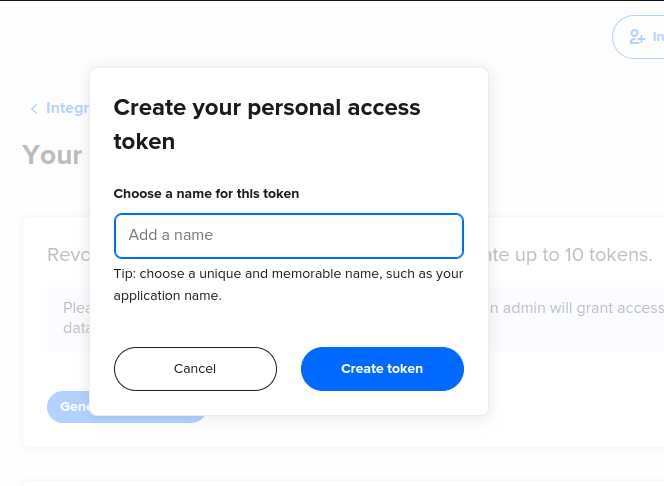
From your WordPress dashboard, by the admin menu, you’ll see EMC, under it, click Settings. Then paste the API key we copied earlier in the V2 API Key input field, and Save the settings.
Now from the admin menu again, go to EMC > Event Types. Click the Sync button, and you should be able to see a list of your Calendly event/meeting types.
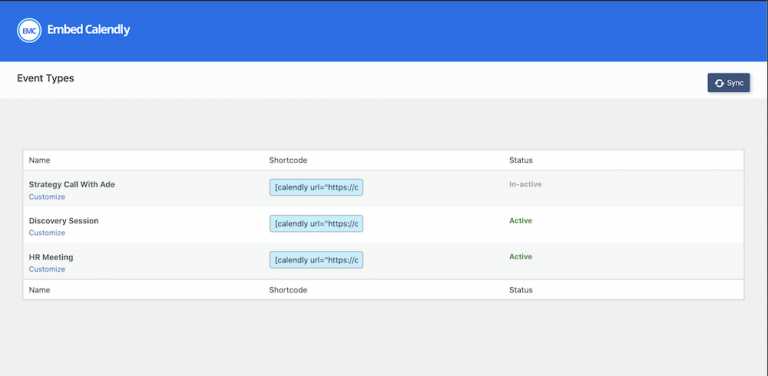
Copy the shortcode beside the event type you want people to book through your site, and past it anywhere in your Home, Services, and Contact page, with Elementor Text Editor widget. Similar to how you created text blocks in Step 7.
You can customize the look of your booking button to suit your site design. Go to admin menu, under EMC, click on Customizer.
Select the event type from the list and click Customize. Then use the live customizer to design your booking button to suit you.
Step 9: Add A Contact Form To Your Contact Page With Ninja Forms
For the contact page, let’s add a simple form that your website visitors can fill to reach you. All the form submissions will be forwarded to the email address you setup WordPress with in Step 2.
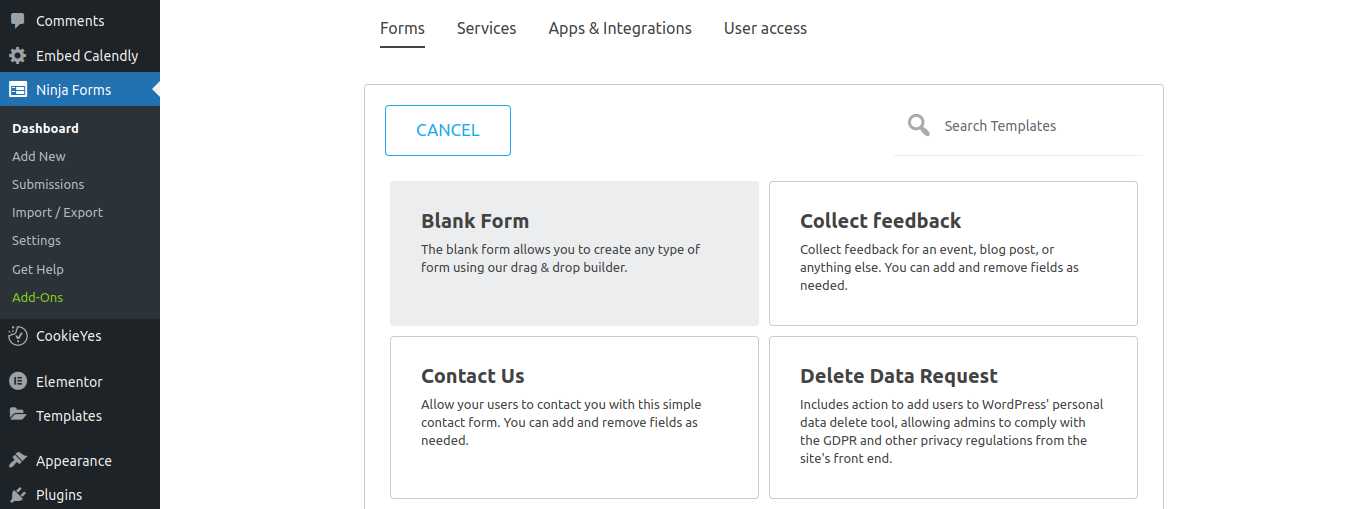
From the admin menu, click on Ninja Forms > Add New. Choose Contact Us from the list of form templates, and hit Publish.
After publishing the form, click on the little icon beside the Publish button, and copy the shortcode you see.
Once you copy the shortcode, go to the contact page we created earlier, and edit the page with Elementor. Add the shortcode anywhere on the page with Elementor Text Editor widget, just as you did in Step 8.
Remember to test the contact form, and confirm submissions are getting delivered to your email. Also check if they are getting stored in Submissions, under Ninja form.
Step 10: Keep Your Website Complaint
After building your coaching business website, it’s important to stay complaint.
If you’re in the US, UK, Germany, or any country with strict data protection regulations, it’s very important to keep your website complaint to avoid lawsuits.
This means clearly stating what data you collect on your website visitors, and asking for users consent where necessary.
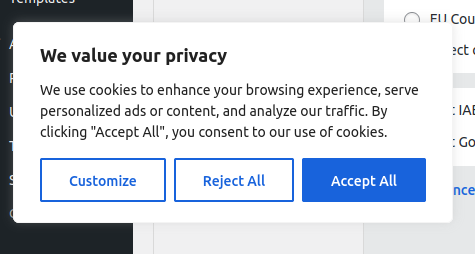
Luckily for us, the CookieYes plugin we installed earlier will do most of the work us. When people visit your website right now, they will see the optin banner like below to get visitor’s consent as needed.
Adding a Privacy Policy Page
Use this Privacy Policy Generator Tool to generate basic privacy policies. Later, you can get a lawyer to draft better policies that suit your coaching business.
Add a new page to your site like we did in Step 5, and paste the policy you generated there, then publish the page.
To add a link to the policy page in the footer area, create a new menu like we did in Step 7. This time, name it footer, and mark the checkbox beside the Footer menu position, then click Create Menu.
After creating the menu, add the Privacy Policy page under the Menu Items, just as you did in Step 7.
Step 11: Launch Your Coaching Business Website
Now that you’ve learned how to build a website for your coaching business, and you’ve completed all the pages design, it’s time to tell the world about your new site!
Feel free to share your website url with your friends and family. Also post about it on your social media pages and groups.
It’s important to tell Google about it too, so check out this article where I talked about how to make your new coaching site show in Google Search results.
Step 12: Perform Ongoing Website Maintenance
To keep your website secure, remember to regularly update all installed WordPress plugins.
Also contact your hosting account customer support, and ask them to setup automatic regular website backup .
Download How To Build A Coaching Business Website With WordPress PDF
Conclusion: All Done! What Next?
Congratulations! You made it to the end! This was a lot of stuff to do but guess what? You can build any website yourself now!
In this tutorial, I explained everything you need to know to learn how to build a website for your coaching business with WordPress.
If you have any questions, feel free to let me know.

I’m a Christian & Business Clarity Coach. I founded Spantus to help purpose-driven entrepreneurs build meaningful, yet profitable businesses. I enjoy building stuff and writing about business, marketing, and tech. I’m deeply passionate about making life easier through technology and can’t wait to launch more projects that do just that!